Signup for our monthly newsletter and get your FREE "Tactical Gear" Guide
How to Lace Tactical Boots the Right Way
- Home
- Tactical Boots Advice
- How to Lace Tactical Boots

This site contains affiliate links to products. We may receive a commission for purchases made through these links.
Knowing how to lace tactical boots the right way will give you the support, comfort, and fit to perform better.
After all, having loose shoelaces can be dangerous and cause you to trip and fall.
That said, there are countless ways to tie tactical boots effectively, and all you need to do is to find the best one that will work for you.
We are here to show you different methods of lacing tactical boots.
Table of Contents
Why It’s Important to Learn Lacing Techniques
Sometimes, people try to use a military lacing pattern because it looks good and then jump into the following trending style.
Your choice of a particular lacing style should not be based on how it looks on you alone but on what kind of benefit you will get from using one.
There are many reasons why learning how to lace tactical boots is essential, including better footwear functionality, comfortability, and support.
For example, those with wide feet can utilize the upper eyelets to tighten the fit of the boots while keeping them loose near their toes.
Alternatively, those with high arches can try a gap-lacing pattern to provide more room for their feet.
These are just some examples of why you must learn different lacing techniques. You will never know when you will need one.
How to Lace Tactical Boots
You will find endless varieties of patterns for lacing tactical boots from aesthetic styles, practical methods, and secure techniques.
Choosing a particular lacing method depends on different factors, including your personal preference and job requirements.
Get ready with a sturdy pair of shoelaces and practice several lacing techniques.
Here are some popular lacing methods you can try on your tactical boots:
1. Army Lacing
As the name suggests, you will find this lacing pattern on footwear worn by uniformed individuals from the armed forces.
In the army lacing technique, the shoelace ends go through each pair of eyelets, crossing each other inside and running straight up the sides.
This lacing pattern makes it less prone for the laces to snag while allowing the sides of the boots to be more flexible.
This flexibility is a valuable factor in helping you during the break-in period of your tactical boots.
If you decide to use this lacing pattern, we recommend using a shorter lace than the original one to eliminate long loose ends.
However, this lacing style seems less supportive compared to other techniques.
Here’s how to do the army lacing technique:
- Feed the ends of the lace into the lowest eyelets.
- Hold the lace on the left and feed it into the next eyelet, forming a loop outside.
- Do the same process for the right lace.
- Cross the laces over and bring them into the next eyelet.
- Repeat the first process of creating an outside loop on both sides.
- Then, repeat the crossing-over method for the second time.
- Complete the pattern by making the third loop before crossing the laces over the tongue and finishing it with a bow.
2. Bow Tie Lacing
The bow tie pattern is the opposite of an army lacing method. So, if you know how to do the former, you will have no problem with this pattern.
They have a similar starting pattern as you run the laces horizontally through the bottom eyelets, ensuring the laces on each side have the same length.
Here’s how you complete the bow tie pattern:
- After the initial step, cross the lace over to the other side and feed it into the next eyelet, inserting it from the top.
- Grab the lace end from inside the boot and run it through the next eyelet above it, forming a loop inside.
- Cross over to the other side and insert the lace from the top.
- Repeat the pattern, ensuring that you create the loops inside the boots until you reach the topmost eyelet.
3. Criss-Cross Lacing
A criss-cross lacing technique is the standard diagonal pattern we usually see on regular boots and sneakers.
Throughout history, the traditional, most basic lacing method feels comfortable because the shoelaces do not press on the foot.
People can create unexpected variations and visually appealing designs using the criss-cross pattern.
If you are aiming for a uniform look, you can use the under-lacing variation by crossing on top of each on the same side.
Here’s how to make the criss-cross lacing pattern:
- Start by feeding the lace end in and out of the two bottom eyelets.
- Cross the lace ends and run them on the next pair of eyelets.
- Repeat the procedure until you reach the last couple of eyelets.

4. Ladder Lacing
The ladder lacing technique is for you if you are looking for the most stable and supportive lacing method.
As the name implies, it has a ladder-like appearance that creates a solid visual impression specifically designed for military use.
Moreover, this lacing method provides a sturdy performance that is hard to change or remove as they lie on the other across the tongue.
However, it is a complex method requiring you to use long laces for the technique to work.
It has a vertical weaving pattern that goes up outside the eyelets.
The ladder lacing pattern would look great on tactical boots, especially those with high uppers and plenty of eyelets.
Although the pattern is quite challenging to tighten if you are in a hurry, most paratroopers prefer this lacing pattern because of its support.
Here’s how to do the ladder lace:
- As mentioned, you must use long laces for this method, so get hold of one. Run it across the bottommost pair of eyelets.
- Pull the ends, ensuring they are balanced.
- Insert each lace end into the eyelet above it.
- Cross over to the other side above the tongue but don’t pull through yet. Instead, thread it under the vertical part made by the other half of the lace.
- Secure the hold by pulling it tight, then run each end into the next eyelet above it.
- Repeat the step from crossing over, threading under vertically, pulling it tight, and running into the one above until the last eyelet.
- On the topmost eyelet, tighten them by tying a knot on the shoes’ inside or threading under the vertical part on the other side.
- Use a square or double knot to prevent the laces from getting undone accidentally.
5. Straight-Bar Lacing
The straight-bar lacing method makes them look horizontally parallel up the boot, providing a quick tightening ability and a clean appearance.
This technique lets you slip on the shoe without going to the trouble of lacing it up each time.
This neat-looking lacing style feels comfortable and offers better foot flexibility.
However, this tying technique provides limited ankle and foot support.
Here’s how to do this technique:
- Thread the lace ends above the two bottom eyelets.
- Grab the right lace end, and thread it up from underneath into the next eyelet.
- Cross it over to the left side and thread it from above into the following eyelet to form the second bar.
- Get the other lace and feed it through the left side into the third eyelet from underneath.
- Cross the lace to the right, and feed it through the third eyelet to create the third bar.
- Repeat the process to the last eyelet and finish the pattern by making a knot and hiding the excess lace in the shoe.
6. Rope Ladder
The rope ladder lacing pattern is another tying method that feels secure and looks great for your overall appearance.
You can also consider it a variation of the most popular lacing technique, ladder lace.
It’s an ideal lacing option for combat or service boots if you want a rugged look.
Moreover, you can use it for hiking boots for added ankle support.
Here’s how to do it:
- Feed the laces into the bottom eyelets, pull vertically, and ensure they are balanced in length on both sides.
- Grab each side of the lace, and cross them horizontally.
- Twist them around each other and pull tight.
- Run the shoestring into the next pair of eyelets.
- Repeat the steps until you reach the topmost eyelets.
Essential Tips to Remember
In addition to lacing techniques, we would like to provide you with the following tips to keep in mind as you tie your boots:
Position Your Shin Properly
It’s always best to place your shin in front of the boots if you try to tie the laces while kneeling, as it puts your feet in the correct position.
It will help reduce the pressure on your feet and minimize the risk of getting stress fractures and shin splints.
Choose the Right Lace
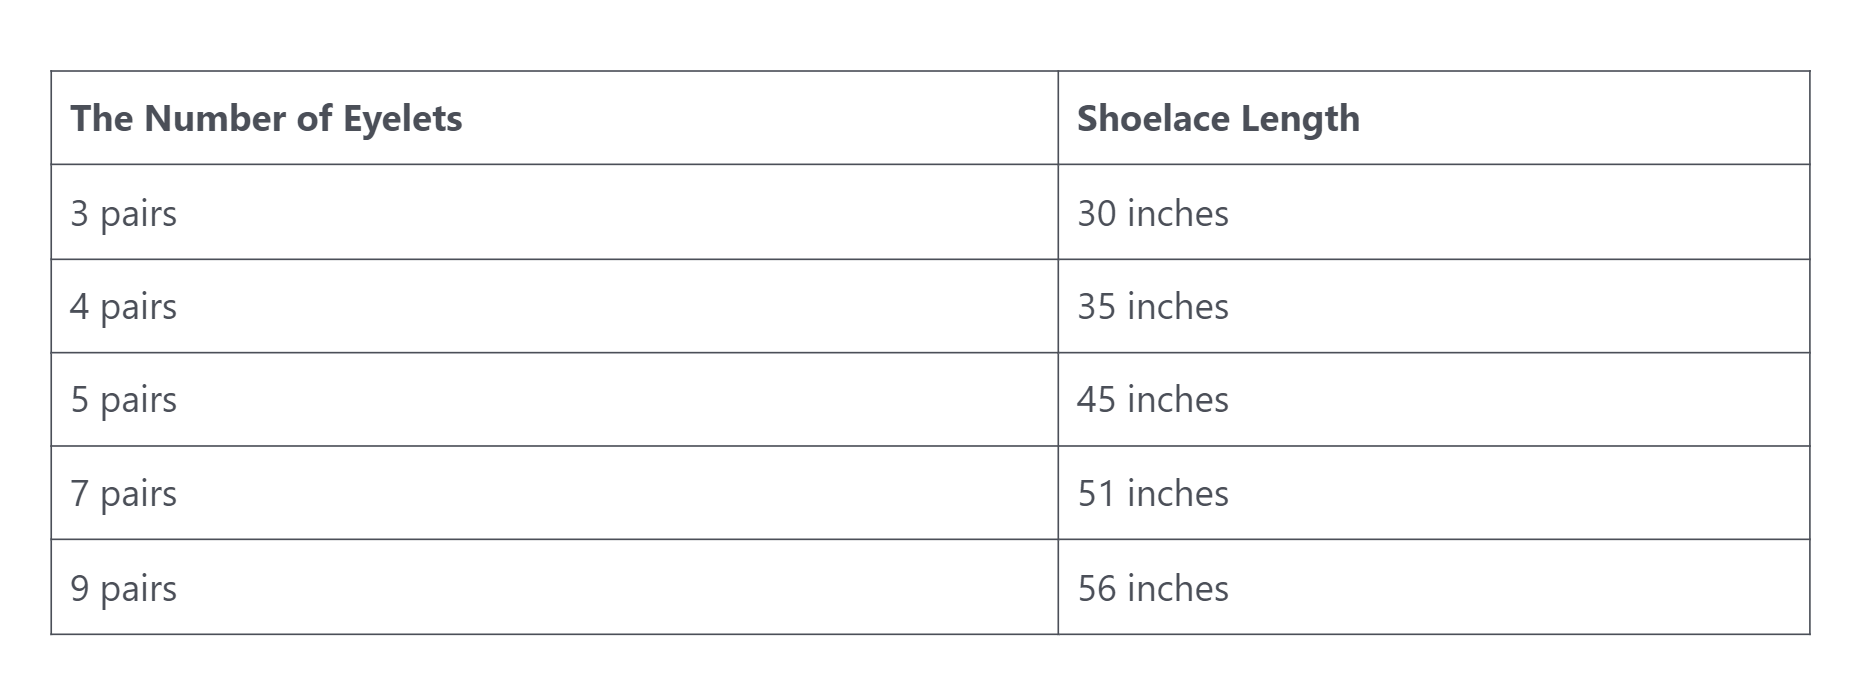
We mentioned you need long and sturdy shoelaces for the lacing patterns we discussed, especially for the ladder lace style.
To help you pick the right length, here is a quick and short guide to follow depending on the number of eyelet pairs your boots have:

Keep Practicing
As the saying goes, “practice makes perfect.” If we want to be honest, we cannot learn something in one try.
Hence, one must constantly practice lacing tactical boots using the various patterns discussed earlier.
You can also use boot bands to conceal loose ends from your laces that might cause you to trip over during an activity.
Choose the Right Lacing Technique Now!
Now that you know how to lace tactical boots, you can try each featured pattern and choose the suitable method that will work for you.
All these lacing styles are ideal for your tactical boots, but each one provides a different level of comfort and support.
Thus, constant practice is essential until you find the perfect method to support your feet and ankle.
You can use these lacing patterns when trying out new footwear or changing your shoelaces.
